Soups & Stews
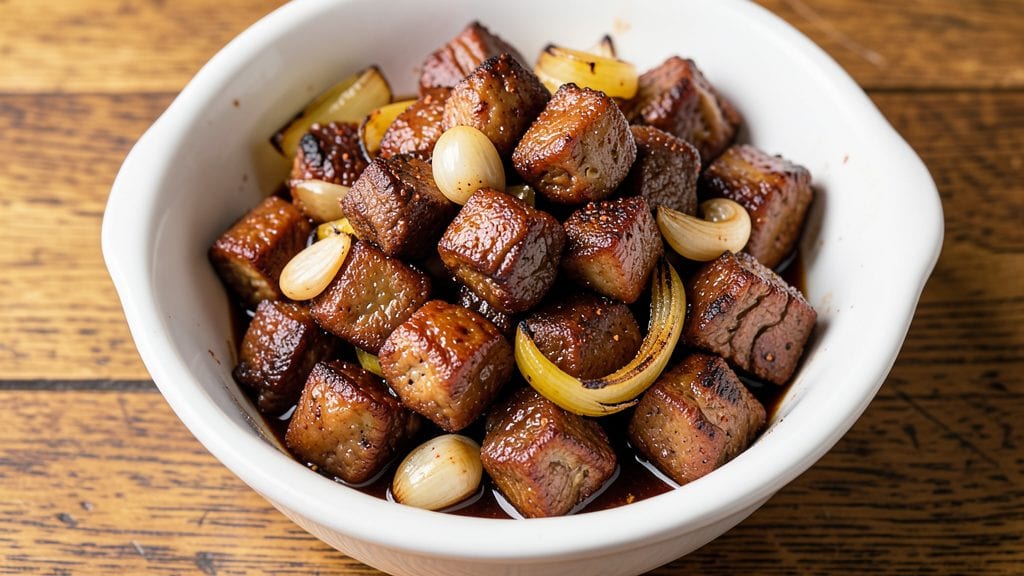
Slow-braising beef belly until it achieves that legendary burnt ends texture transforms tough cuts into melt-in-your-mouth perfection. This recipe delivers restaurant-quality richness with a deep, caramelized crust that balances perfectly with tender meat inside.
The key lies in patience—rendering fat, searing edges, and braising until the connective tissue dissolves into velvety flavor. Every bite offers a symphony of textures and umami depth that makes this dish a crowd-pleaser.
The process begins with a high-heat sear to develop that signature char, followed by a slow braise that breaks down collagen into gelatinous richness. A splash of vinegar or pickles at the end cuts through the fat, creating balance that prevents heaviness.
Professional results come from precise timing and technique, but the reward—a plate of fall-apart beef with crispy edges—is worth every minute spent in the kitchen.
What you’ll end up with is a dish so tender it practically dissolves on the tongue, yet maintains enough structure to hold its shape on the plate.
The aroma alone will have everyone gathering around your table, while the flavor profile—deep, smoky, and slightly sweet—makes this a standout for special occasions or casual dinners alike. Serve with mashed potatoes or crusty bread to soak up every last bit of that luscious braising liquid.
This recipe isn’t just about the meat—it’s about the experience. The slow cooking process transforms simple ingredients into something extraordinary, proving that time and technique create magic. Whether you’re feeding a crowd or treating yourself to a luxurious meal, these beef belly burnt ends deliver satisfaction that’s hard to beat.
Let’s get started on creating your own showstopper dish.
Ingredients for beef belly burnt ends
Sixteen ingredients transform tough beef belly into restaurant-worthy burnt ends through slow braising and caramelization.
| Ingredient | Amount | Notes |
|---|---|---|
| Beef Belly 🥩 | 4 lb | Thick-cut, fatty sections preferred |
| Yellow Onions 🧅 | 2 whole | Yellow or red, cut into wedges |
| Garlic Cloves 🧄 | 8 cloves | Fresh, peeled and smashed |
| Apple Cider Vinegar 🍎 | ½ cup | For acidity balance |
| Brown Sugar 🍚 | ½ cup | Light or dark, packed |
| Smoked Paprika 🌶️ | 2 tbsp | For smoky depth |
| Ground Black Pepper 🌶️ | 1 ½ tbsp | Freshly cracked preferred |
| Diamond Crystal Kosher Salt 🧂 | 1 ½ tbsp | For seasoning and rendering |
| Beef Broth 🥛 | 2 cups | Low-sodium preferred |
| Dijon Mustard 🍯 | 1 tbsp | For subtle tang |
| Dried Thyme 🌿 | 1 tbsp | Or 1 tbsp fresh thyme |
| Dried Oregano 🍃 | 1 tbsp | Italian preferred |
| Dried Bay Leaves 🌿 | 2 whole | For aromatic depth |
| Unsalted Butter 🧈 | 2 tbsp | For basting edges |
| Pickle Juice 🥒 | ¼ cup | For acidity balance |
The beef belly is the foundation—select thick-cut sections with ample marbling for optimal flavor and tenderness. Local butchers often carry premium cuts, while Costco offers reliable quality at bulk prices. Look for sections with visible fat layers; these render beautifully during the slow cook. If using pre-cut portions, ensure they're at least 1-inch thick to prevent over-browning before the interior tenderizes. For the best results, source beef from USDA Choice or Prime grades, which provide superior marbling and texture. The onions and garlic should be fresh, with vibrant yellow skins and no soft spots—Trader Joe's often carries affordable organic options.
Substitutions are possible but may alter texture or flavor. No beef belly? Pork belly works similarly, though cooking times may vary slightly. For vinegar, red wine vinegar or balsamic vinegar can substitute at equal amounts, though apple cider adds a subtle sweetness. Brown sugar substitutes include maple syrup or honey, though they may yield slightly different caramelization. If you lack smoked paprika, liquid smoke (1/2 tsp) plus regular paprika mimics the effect. For the broth, beef stock or even water in a pinch suffices, though the umami depth will differ. Fresh thyme can be swapped for dried at a 3:1 ratio, while bay leaves can be omitted entirely if unavailable.
Store the braised beef belly in its rendered fat for up to 5 days in the refrigerator, as the fat acts as a natural preservative. For longer storage, portion into airtight containers and freeze for up to 3 months. Reheat gently in the oven at 300°F (150°C) until warmed through, basting with a little of the reserved braising liquid to restore moisture. The burnt ends reheat exceptionally well, making them ideal for meal prep. For serving, reserve some of the braising liquid to drizzle over the top, enhancing both flavor and presentation. The caramelized edges will crisp up slightly upon reheating, adding to the dish's appeal.
Why You'll Love This Recipe
- Foolproof Simplicity: I swear by this recipe because it’s the kind of dish that forgives mistakes. You just sear the beef belly until it’s deep brown, toss in sliced onions and garlic, then let the apple cider vinegar and brown sugar work their magic in the oven. No fancy techniques—just hands-off cooking while you sip your coffee or scroll through memes.
- Sweet-Savory Magic: That crispy, caramelized edge on the beef belly? It’s where the brown sugar and vinegar create pure satisfaction. The onions turn sticky-sweet, the garlic mellows into richness, and suddenly, you’ve got a flavor bomb that tastes like it simmered all day—even if it only took 45 minutes.
- Game for Any Meal: Between us, these burnt ends are my go-to for tailgates, lazy Sundays, or when I need to impress someone with minimal effort. Serve them on toasted buns for sliders, pile them over mashed potatoes, or just eat them straight from the pan with a fork—no judgment here.
- Leftovers That Don’t Suck: Honestly, the best part? The next day, they’re even better. The beef belly gets more tender, the sauce thickens into a glossy glaze, and suddenly, you’ve got a weeknight dinner solved. Freeze half for another time, and you’ve got a budget-friendly protein powerhouse that’ll make you look like a hero.
Step-by-step instructions for beef belly burnt ends
Mastering these burnt ends requires patience and precision—here's how to transform tough beef belly into melt-in-your-mouth perfection.
Prepare and Season the Beef Belly
Begin by trimming excess fat from the beef belly, leaving a thin layer for flavor and moisture. Cut the belly into 2-inch cubes, ensuring each piece has a good balance of fat and meat. In a large bowl, combine the beef belly cubes with the 2 whole yellow onions cut into wedges, 8 cloves garlic cloves smashed to release their aroma, 0.5 cup apple cider vinegar, 0.5 cup brown sugar, 2 tablespoons smoked paprika, 1.5 tablespoons ground black pepper, and 1.5 tablespoons diamond crystal kosher salt.
Massage the mixture thoroughly with your hands, coating each piece of beef belly evenly. This step ensures the seasoning penetrates deeply and creates a flavorful crust. Let the mixture rest at room temperature for 30 minutes while you prepare your cooking vessel. The beef belly will absorb the marinade and begin to tenderize, setting the stage for the braising process.
Sear the Beef Belly for Depth of Flavor
Heat a large Dutch oven over medium-high heat until it's smoking hot. Working in batches to avoid overcrowding, add the seasoned beef belly cubes and sear for 3-4 minutes per side until they develop a deep golden-brown crust. This step is critical—it locks in juices and builds layers of flavor through the Maillard reaction.
Remove the seared beef belly and set it aside, leaving the rendered fat in the Dutch oven. Add the 2 tablespoons unsalted butter to the pot and let it melt, then add the reserved onions and garlic. Cook for 2-3 minutes until the onions soften and the garlic becomes fragrant. This aromatic base will infuse the braising liquid with depth.
Braise Until Fork-Tender
Return the seared beef belly to the Dutch oven. Pour in the 2 cups beef broth, 1 tablespoon Dijon mustard, 1 tablespoon dried thyme, 1 tablespoon dried oregano, and 2 whole dried bay leaves. Stir gently to combine, ensuring the beef belly is fully submerged in the liquid. Bring the mixture to a simmer over medium heat, then reduce the heat to low and cover with a tight-fitting lid.
Transfer the Dutch oven to a preheated 300°F oven. Braise for 3 hours, then check for doneness. The beef belly should be fork-tender, with the meat pulling apart easily. If it's not yet tender, continue braising for another 30-60 minutes. The liquid should have reduced significantly, creating a rich, concentrated sauce that coats the beef belly.
Finish with Acid and Rest
Remove the beef belly from the oven and carefully ladle out 1 cup of the braising liquid into a small saucepan. Add the 0.25 cup pickle juice to the saucepan and simmer over medium heat for 5 minutes to balance the richness with tang. Strain the liquid through a fine-mesh sieve to remove any solids, then return it to the Dutch oven.
Increase the oven temperature to 400°F and return the beef belly to the Dutch oven. Baste the burnt ends with the reduced braising liquid and broil for 5-7 minutes until the edges are caramelized and bubbly. Let the burnt ends rest for 15 minutes before serving, allowing the juices to redistribute. This final step ensures each bite is moist, flavorful, and irresistibly tender.
Pro Tips For Making Beef Belly Burnt Ends
- Trim the Fat First: Beef belly’s fat is flavor gold, but too much in one piece makes even browning a nightmare. Use kitchen shears to snip the fat into 1-inch chunks—smaller pieces render faster and crisp up better. (Yes, this takes 10 minutes, but it’s worth it when your burnt ends look like caramelized confetti.)
- Sweat Onions Low: I used to rush the onions and end up with bitter, waterlogged mush. For burnt ends, cook them on medium-low with a splash of apple cider vinegar (about 1 tablespoon) until they’re golden and jammy—about 20 minutes. The acid softens them faster than heat alone, and it cuts through the richness of the beef.
- Deglaze Aggressively: That brown crust on your pan? Don’t scrape it half-heartedly. Use a wooden spoon to forcefully scrape up every bit, then hit it with ½ cup apple cider vinegar and 2 tablespoons brown sugar. Let it bubble for 30 seconds—this is where the depth of flavor lives. (I learned this after tasting a bland version where I skimped.)
- Braise Until Fork-Tender: Beef belly needs time—at least 2.5 hours in liquid (broth, vinegar, or beer) until it falls apart with a fork. Skimping here makes burnt ends tough. If you’re short on time, add a splash of vinegar to the braising liquid; the acid helps break down collagen faster. (Your future self will curse you if you serve chewy bits.)
Troubleshooting great beef belly burnt ends
Uneven Cooking Fix
If your burnt ends cook unevenly, rotate the Dutch oven halfway through braising to ensure even heat distribution. I’ve found that placing the pot on the middle rack of your oven helps maintain consistent temperatures.
For extra insurance, use an oven thermometer to confirm your oven is actually at 300°F—many ovens run 25°F hotter or colder than set. 🌡️
Preventing Overly Dry Meat
Overcooking is the #1 cause of dry burnt ends. Use a meat thermometer to check internal temperature—aim for 195-203°F (probe the thickest piece without touching bone). If the liquid reduces too quickly, add ¼ cup beef broth during braising.
I also recommend covering the pot with a lid slightly ajar for the last 30 minutes to trap steam and prevent moisture loss.
Fat Rendering Issues
If your beef belly isn’t rendering fat properly, sear it in a colder pan over medium heat (not high) to allow fat to melt gradually. For stubborn fat, use a spatula or tongs to lift pieces and let fat drip down.
If fat pools at the bottom but won’t brown, increase heat to medium-high for 2-3 minutes to caramelize it—this adds depth to the final flavor.
Caramelized Edges Fail
For that signature crispy crust, broil the burnt ends for 5-7 minutes at 400°F after adding pickle juice. Watch closely—they’ll darken quickly! If edges aren’t caramelizing, brush them with a mix of 1 tbsp butter + 1 tbsp beef broth before broiling.
I also recommend using a cast-iron skillet for broiling—it conducts heat better than glass.
Braising Liquid Too Thin
If your braising liquid is watery, reduce it uncovered on the stovetop over medium-high heat for 10-15 minutes before finishing in the oven. For extra richness, add 1 tbsp cold butter at the end—it’ll emulsify into a silky sauce.
If the liquid still looks thin, simmer it longer or reduce the initial broth to 1 cup instead of 2 cups.
Acid Balance Problems
Too much pickle juice? The tang can overpower the beef. Start with ¼ cup and adjust to taste—simmering longer reduces acidity. For a milder finish, use apple cider vinegar instead.
If the dish tastes flat, add a pinch of smoked paprika or a dash of hot sauce to brighten flavors. 💡
Nutrition facts
Frequently asked questions
Why do burnt ends need to be slow-cooked?
Slow-cooking breaks down collagen in the beef belly into gelatin, creating that signature tender, melt-in-your-mouth texture. The 3-hour braise at 300°F ensures even cooking while developing deep, caramelized flavors through rendered fat. Rushing this process results in tough, chewy meat instead of luxurious richness.
Can I make burnt ends without a Dutch oven?
Yes! Use a heavy pot with a tight-fitting lid, like a cast-iron skillet or enamel-coated pot. For best results, sear in a skillet first, then transfer to the pot for braising. A slow cooker also works—cook on low for 8-10 hours, adding liquid as needed to prevent drying. The key is maintaining moisture and even heat distribution.
How do I get the perfect crispy edges?
After braising, broil the burnt ends at 400°F for 5-7 minutes until edges caramelize. For extra crispiness, brush them with a mix of 1 tbsp butter + 1 tbsp beef broth before broiling. Use a cast-iron skillet for even heat conduction, and watch closely—they darken quickly!
What’s the best way to reheat burnt ends?
Reheat in the oven at 300°F for 15-20 minutes, basting with reserved braising liquid to restore moisture. Avoid microwaving—it makes edges soggy. For extra richness, add a splash of pickle juice or apple cider vinegar to the reheating liquid. Store leftovers in the braising fat for up to 5 days or freeze for 3 months.
Can I substitute pork belly for beef belly?
Yes, but adjust cooking time—pork belly tenderizes faster (aim for 2.5-3 hours instead of 3). The fat renders differently, so monitor closely to avoid over-browning. For flavor balance, reduce smoked paprika to 1 tbsp and add ½ tsp liquid smoke to mimic beef’s depth. The texture will be slightly firmer but still delicious.