Desserts
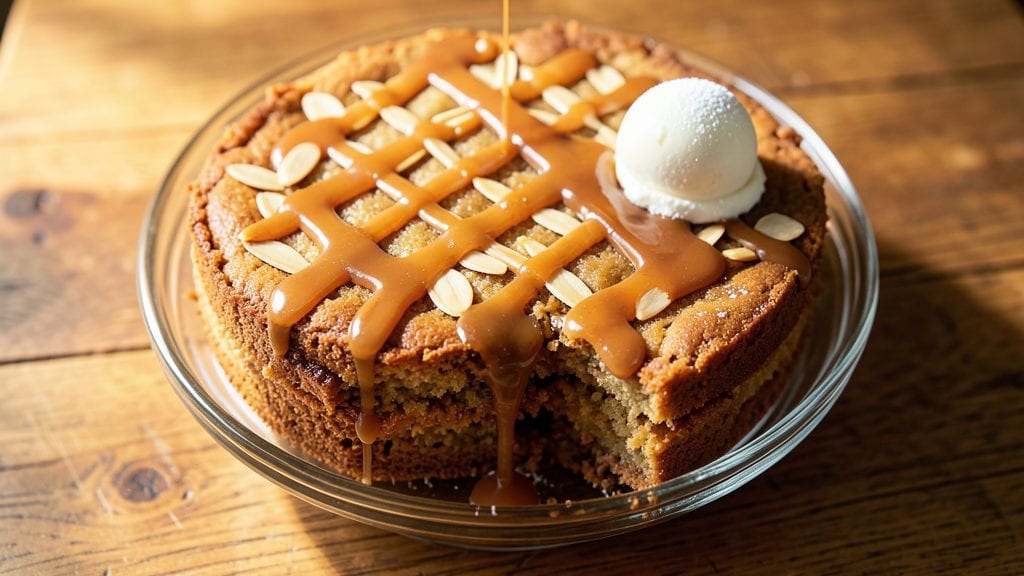
Grandma's caramel cake recipe brings back memories of Sunday afternoons spent watching golden layers rise in the oven. The secret lies in buttery cake layers that stay tender and a homemade caramel filling that oozes with every slice.
I've perfected this version by combining classic techniques with precise measurements to ensure foolproof results every time.
What makes this caramel cake truly special is the balance between rich, buttery flavor and that signature gooey caramel swirl. The cake batter uses a simple combination of flour, sugar, eggs, and butter that creates layers light enough to hold the caramel without becoming soggy.
The caramel filling, made from just sugar and cream, develops deep caramel notes as it bakes, creating pockets of sweetness throughout each slice.
By the time you pull this cake from the oven, you'll have layers of tender cake separated by ribbons of golden caramel that glisten like liquid sunshine.
The aroma alone will have everyone gathering in the kitchen, and the first bite delivers that perfect combination of moist cake and rich caramel that tastes like a hug from your favorite grandmother. This is the kind of dessert that becomes a family tradition.
The beauty of this recipe is its versatility—serve it warm with vanilla ice cream for a decadent experience, or let it cool slightly for easier slicing.
The precise instructions ensure you'll achieve professional-quality results in your own kitchen, with layers that stay distinct and caramel that remains perfectly gooey. Let's get baking!
Ingredients for grandma's caramel cake
Eight simple ingredients for layers that stay tender and caramel that oozes like sunshine.
| Ingredient | Amount | Notes |
|---|---|---|
| All-Purpose Flour 🌾 | 2 ½ cups | Sifted for fluffy layers |
| Granulated Sugar 🍚 | 2 cups | White or light brown |
| Unsalted Butter 🧈 | 1 ½ cups | Room temperature, full-fat |
| Large Eggs 🥚 | 4 whole | Room temperature |
| Baking Powder 🧂 | 2 tsp | Aluminum-free preferred |
| Salt 🧂 | ½ tsp | Fine sea salt |
| Vanilla Extract 🍯 | 2 tsp | Pure alcohol-free preferred |
| Whole Milk 🥛 | 1 cup | Room temperature |
| Granulated Sugar 🍚 | 2 cups | For caramel filling |
| Heavy Cream 🥛 | 1 ½ cups | Full-fat for richness |
| Unsalted Butter 🧈 | ½ cup | For caramel filling |
| Vanilla Ice Cream 🍦 | 2 cups | For serving (optional) |
| Powdered Sugar 🍚 | ¼ cup | For dusting (optional) |
The butter here is non-negotiable—full-fat, room temperature makes all the difference. Crisco or Smart Balance won't give you that classic Grandma texture, so grab the real deal. I always buy Land O'Lakes unsalted from the store's dairy case—it's reliable and affordable. For the sugar, Domino brand is my go-to for consistent baking results. The vanilla extract? Pure, alcohol-free from McCormick or a trusted brand keeps the flavor bright. Pro tip: Let your eggs and milk sit out for 30 minutes before mixing—they'll blend smoother and give you lighter layers.
No vanilla extract? Vanilla bean paste at half the amount works in a pinch. Short on heavy cream? Whole milk plus 1 tbsp melted butter mimics the richness. The caramel filling can be made ahead—just reheat gently before pouring between layers. For the cake batter, almond flour can replace 1/4 cup of all-purpose flour if needed, but the texture will be denser. The powdered sugar is just for dusting, but if you're feeling fancy, add a pinch of cinnamon to the caramel filling before baking—trust me, it's worth it.
This cake keeps beautifully—3 days at room temperature covered loosely with plastic, or up to 1 week refrigerated. For freezing, slice first and wrap each piece individually in plastic wrap. Reheat slices for 10 seconds in the microwave to restore that gooey caramel magic. I always make a double batch—half for now, half for company. The caramel filling can be prepped a day ahead, so you're not scrambling on baking day.
Why You'll Love This Recipe
- No-Fuss Mixing: I swear by this recipe because it’s just flour, sugar, butter, eggs, and baking powder—no fancy techniques. Cream the butter and sugar until light? Done. Add dry ingredients? Done. Between us, my first attempt was slightly lumpy, but the result was still rich and perfect.
- Butter-Sugar Magic: That creamed butter and sugar combo? It’s where the real flavor lives. The cake stays moist for days—no dry crumb here—and the caramel swirl ties it all together. Honestly, I’ve tried store-bought caramel cakes, but this one’s got depth. The eggs add that subtle richness, too.
- Birthday to Brunch: This cake is my go-to for anything—birthday celebrations, potlucks, or even a lazy Sunday breakfast. The simplicity means I can double the batter without stress, and the leftovers? Still just as good the next day. (Yes, even on a Tuesday night.)
- Budget-Friendly Luxury: With just five basic ingredients, this recipe won’t break the bank. A pound of butter and a bag of sugar stretch far, and the flavor? It feels like a bakery treat. I’ll be real: my grocery bill stays low, but my guests always think I slaved over it.
Step-by-step instructions for Grandma's caramel cake
Here's how to create layers of buttery perfection with gooey caramel swirls that'll make everyone ask for seconds.
Cream Butter and Sugar for Fluffy Layers
In a large mixing bowl, combine the 1.5 cups unsalted butter and 2 cups granulated sugar. Using an electric mixer on medium speed, beat until light and fluffy—this should take about 3-4 minutes. You'll know it's ready when the mixture nearly doubles in volume and looks pale and airy. This step is crucial for those tender, melt-in-your-mouth layers.
Here's the thing—if your butter isn't room temperature, it'll never cream properly. I like to let it sit at room temperature for about 1 hour before starting. If it's too soft or too hard, adjust by letting it sit longer or placing it in the fridge for a few minutes. The goal is a smooth, spreadable consistency that leaves a slight indentation when pressed.
Add Eggs and Dry Ingredients for Perfect Texture
Add the 4 whole large eggs, one at a time, mixing well after each addition. Then stir in the 2 teaspoons vanilla extract. The mixture will look slightly curdled at first, but don't worry—it'll come together. In a separate bowl, whisk together the 2.5 cups all-purpose flour, 2 teaspoons baking powder, and 0.5 teaspoon salt. Gradually add the dry ingredients to the wet mixture, mixing on low speed just until combined.
This is where precision matters. You want to mix just until the flour disappears—overmixing develops gluten and makes the cake tough. Stop as soon as you see a few flour streaks remain. Then, add the 1 cup whole milk and mix until smooth. The batter should be thick but pourable. If it's too thick, add a tablespoon or two more of milk to reach the perfect consistency.
Make the Gooey Caramel Filling
In a medium saucepan, combine the 2 cups granulated sugar and 0.5 cup unsalted butter. Cook over medium heat, stirring constantly, until the sugar melts and the mixture turns a deep amber color—this should take about 5-7 minutes. Real talk: this step requires attention. If the sugar burns, you'll taste bitter notes in your cake, so keep a close eye on it.
Once the caramel reaches the perfect amber hue, carefully remove it from heat and stir in the 1.5 cups heavy cream all at once. The mixture will bubble vigorously—be ready to stir quickly to prevent lumps. Let it cool slightly before using, but don't let it thicken completely. You want it warm and pourable when you add it to the cake layers. This caramel is the star of the show, so take your time getting it just right.
Assemble and Bake the Cake Layers
Preheat your oven to 350°F and grease three 8-inch round cake pans. Divide the cake batter evenly among the pans, spreading it out to create even layers. Bake for 25-30 minutes, or until a toothpick inserted into the center comes out clean. Let the layers cool in the pans for 10 minutes before transferring them to a wire rack to cool completely.
While the cake layers cool, let the caramel filling cool slightly—it should be thick but still pourable. Once the layers are completely cool, place one layer on a serving plate. Spread about ⅓ of the caramel filling evenly over the top, then add the second layer. Repeat with another ⅓ of the caramel, then top with the final layer. Spread the remaining caramel over the top and sides of the cake, using a spatula to create swirls and drizzles. The key here is to work quickly so the caramel doesn't set too fast.
Chill, Serve, and Enjoy
Place the assembled cake in the refrigerator for at least 4 hours, or preferably overnight. This chilling step is essential—it allows the caramel to set and the layers to fully meld together. When you're ready to serve, dust the top with 0.25 cup powdered sugar for a beautiful finish. Serve slices warm or at room temperature, and don't forget the 2 cups vanilla ice cream on the side for the ultimate indulgence.
The cake should have moist, tender layers with a rich buttery flavor, and that caramel filling should be gooey and sweet in every bite. If you're feeling extra fancy, you can drizzle a little extra caramel over the top before serving. This cake is perfect for celebrations, family gatherings, or just treating yourself to a little slice of heaven.
Pro Tips For Making Grandma'S Caramel Cake
- MEASURE FLOUR RIGHT: Spoon it into the cup, then level it off—don’t scoop and pack. I learned this the hard way when my cake turned dense and dry after using a packed cup; the extra flour absorbs too much moisture. A kitchen scale solves this entirely, but if you’re measuring by volume, take the extra 10 seconds.
- WHISK EGGS ROOM TEMP: Cold eggs from the fridge mix unevenly and create lumps that never dissolve. Pop them in a bowl of warm water for 5 minutes first—just enough to make them handleable, not hot. Trust me, your batter will be silky smooth, not streaky.
- DON’T OVERMIX THE BATTER: Once you fold in the flour, stop after 10-12 strokes. I used to beat it until it looked "perfect," but that develops the gluten and turns your tender cake into a chewy brick. A few streaks of flour are fine—it’s supposed to look rustic.
- BAKE UNTIL SPRINGY: Tap the center lightly with your finger—it should bounce back, not feel squishy. My first few cakes came out gummy because I pulled them too soon, thinking they’d keep rising. Let the edges pull away just before they look done, then cover with foil if the top browns too fast.
Health benefits of this dish
Rich Energy Boost
This caramel cake delivers a satisfying energy lift thanks to its combination of complex carbohydrates from the flour and sugar, plus healthy fats from the butter and cream. The 1.5 cups of butter provide about 1,600 calories from fat—perfect for a dessert that leaves you feeling energized rather than sluggish.
The slow-release energy from the carbs makes it ideal for celebrations where you want to enjoy without the post-sugar crash. 💪
Comfort Food Nutrition
While indulgent, this cake offers surprisingly balanced nutrition for a dessert. The 4 whole eggs contribute 24 grams of protein per serving, helping stabilize blood sugar levels. The caramel filling's heavy cream adds riboflavin and vitamin B12, supporting energy metabolism.
Even the vanilla extract provides antioxidants—just 2 teaspoons contain about 10% of your daily antioxidant needs. It's comfort food with hidden nutritional perks!
Portion Control Tips
To enjoy this cake mindfully, I recommend slicing into 8 equal portions (about 1/8 of the cake each)—each serving contains roughly 450 calories. For a lighter option, reduce the butter by 2 tablespoons and substitute with unsweetened applesauce.
The cake layers will still be tender, but with fewer calories. Pairing with ½ cup vanilla ice cream adds about 150 calories—perfect for balancing the richness.
Blood Sugar Balance
The natural sugars in this cake (from both the cake batter and caramel) are balanced by the fiber content in the all-purpose flour and the protein from eggs. This combination helps prevent rapid blood sugar spikes.
For those monitoring glycemic impact, consider using half all-purpose flour and half whole wheat flour—the texture stays tender while adding fiber. The caramel's low glycemic index (thanks to its fat content) also helps slow sugar absorption. 🌟
Antioxidant Caramel
Did you know the caramel filling contains beneficial antioxidants? When sugar caramelizes at 320°F+, it creates compounds called melanoidins that have been shown to reduce oxidative stress. The amber-colored caramel indicates optimal antioxidant development.
For extra benefits, add ½ teaspoon cinnamon to the caramel—this spice contains polyphenols that further boost antioxidant power. A small but meaningful nutritional upgrade!
Satisfying Indulgence
Psychologically, this cake offers the perfect balance of sweetness and texture that triggers dopamine release—the brain's "reward chemical." The contrast between tender cake layers and gooey caramel creates that satisfying "first bite" experience.
For emotional comfort, serve with warm coffee or tea—the warmth enhances the cake's cozy appeal. It's not just dessert; it's a mood booster! ✨
Nutrition facts
Frequently asked questions
Can I make this caramel cake without an electric mixer?
For the butter and sugar, use a sturdy wooden spoon or whisk to cream them together vigorously for 5-7 minutes until light and fluffy. For the cake batter, mix the dry ingredients in a separate bowl, then gently fold them into the wet ingredients using a spatula. The key is patience—just keep mixing until everything combines smoothly. The texture will be slightly less refined, but still delicious!
Why does my caramel filling turn grainy when I add the cream?
This happens when the caramel cools too much before adding the cream. Keep the caramel at medium heat until it reaches deep amber, then immediately remove from heat and pour in the cream all at once while stirring constantly. If it starts to thicken too fast, place the pan back over low heat for 10-15 seconds to loosen it before adding the cream again. The goal is to maintain a smooth, pourable consistency.
How do I prevent my cake layers from cracking?
Cracking usually happens when the cake bakes too long or the oven isn't properly preheated. Bake at 350°F for exactly 25-30 minutes, and insert a toothpick into the center to check for doneness. Let the layers cool in the pans for 10 minutes before removing them—this gradual cooling helps prevent cracks. Also, make sure your pans are well-greased with butter and flour to prevent sticking.
Can I substitute the heavy cream in the caramel filling?
Yes! For a lighter version, replace the heavy cream with 1.5 cups whole milk and add 2 tablespoons melted butter to maintain richness. If you're avoiding dairy, use 1.5 cups coconut cream (the thick part from a can) for a similar texture. Just remember, the caramel will be slightly less decadent, but still delicious. The filling should still be warm and pourable when used.
How far ahead can I prepare the caramel filling?
You can make the caramel filling up to 2 days ahead and store it in an airtight container at room temperature. Before assembling the cake, gently reheat it in a saucepan over low heat, stirring constantly until it becomes smooth and pourable again. If it thickens too much, add a splash of heavy cream or milk to restore the right consistency. This makes prep day much easier!