Main Courses
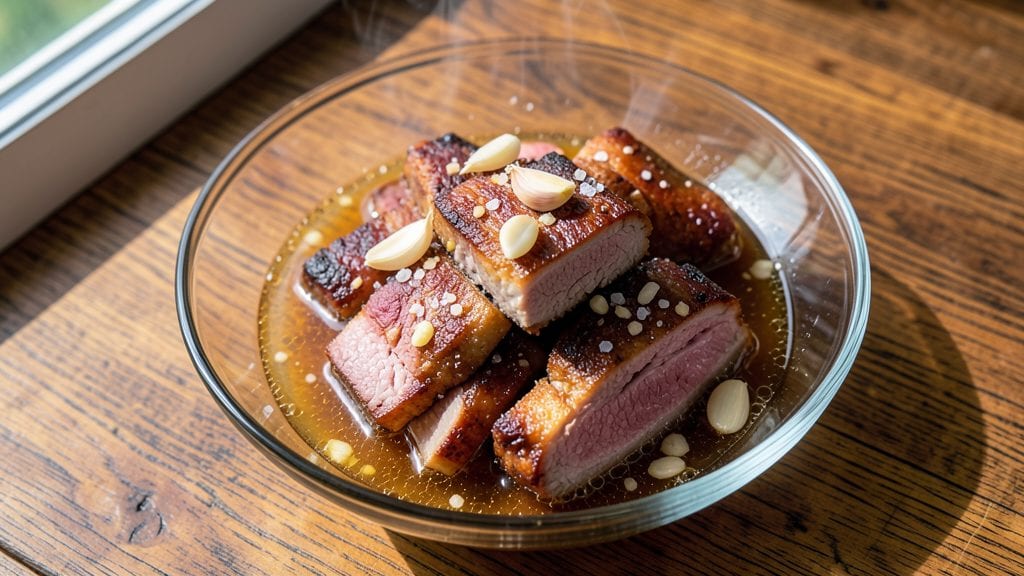
This pickled meat recipe transforms ordinary cuts into restaurant-worthy dishes with just a few simple ingredients and patience. The secret lies in balancing acidity and spices to create tender, tangy meat that keeps for weeks—perfect for sandwiches, tacos, or charcuterie boards.
I first mastered this technique during a particularly busy week when I needed to stretch a small pork shoulder into multiple meals without sacrificing flavor.
The process begins with selecting the right cut—pork shoulder, beef brisket, or even chicken thighs all work beautifully. You’ll cure the meat with a mix of vinegar, salt, and aromatic spices like bay leaves and mustard seeds, then let it sit in the refrigerator for at least 48 hours.
This isn’t just preservation; it’s flavor development, turning tough cuts into melt-in-your-mouth perfection. The key is precision: too much salt can overpower the meat, while insufficient acidity risks spoilage.
By the time you’re done, you’ll have meat that’s tender, tangy, and packed with complex flavors—far beyond anything store-bought. The pickling liquid becomes a flavor bomb itself, perfect for drizzling over roasted vegetables or using as a marinade.
This method works equally well for quick weeknight dinners or meal prep, making it a game-changer for home cooks who want restaurant-quality results without the fuss.
Serve your pickled meat on crusty bread with mustard, piled high in tacos, or sliced thin for charcuterie boards. The possibilities are endless, and the leftovers? They’ll keep for weeks in the fridge, ready to elevate any meal. Let’s get started—your taste buds (and future dinners) will thank you.
Ingredients for pickled meat
Fourteen ingredients, weeks of flavor—transforming tough cuts into melt-in-your-mouth perfection.
| Ingredient | Amount | Notes |
|---|---|---|
| Pork Shoulder 🥓 | 2 lb | Bone-in for best flavor, cut into 1-inch cubes |
| White Vinegar 💧 | 2 cups | Distilled works best for clarity |
| Water 💧 | 2 cups | Filtered preferred for purity |
| Diamond Crystal Kosher Salt 🧂 | ¾ cup | Not iodized, for proper curing |
| Granulated Sugar 🍚 | ½ cup | White or brown, dissolved first |
| Garlic Cloves 🧄 | 6 cloves | Crushed for aromatic release |
| Black Peppercorns 🌶️ | 1 tbsp | Crushed, not ground |
| Mustard Seeds 🌶️ | 1 tbsp | Whole, for subtle heat |
| Bay Leaves 🍃 | 4 whole | Fresh preferred, dried works |
| Yellow Mustard 🍯 | 2 tbsp | Dijon for more complexity |
| Apple Cider Vinegar 🍎 | ½ cup | For fruity depth |
| Fresh Thyme 🌿 | ¼ cup | Chopped, stems removed |
| Red Wine 🍷 | ½ cup | Dry, like Cabernet |
The meat selection is everything here. Pork shoulder gives you that perfect balance of fat and lean, but beef brisket or chicken thighs work just as well—just adjust the curing time. I always grab bone-in pork shoulder from Costco or my local butcher shop, where they can cut it precisely. Look for cuts with good marbling—those white fat streaks are flavor gold. If you're using beef, trim any large fat deposits first, but leave the smaller ones for moisture during cooking. The vinegar matters too: white vinegar keeps things clear, while apple cider vinegar adds subtle sweetness. Grab a bottle from Trader Joe's if you want something affordable and consistent.
Running short on time or ingredients? Substitute apple cider vinegar for white vinegar in a 1:1 ratio, though the flavor will be slightly sweeter. No fresh thyme? Dried thyme at one-third the amount works, but fresh is ideal. The mustard seeds can be skipped if you're sensitive to heat, but I promise you won't miss them—they add a subtle crunch and depth. For the red wine, any dry red will do—Cabernet, Merlot, whatever's open. If you're avoiding alcohol, extra apple cider vinegar or even grape juice works in a pinch. The sugar? Brown sugar adds a caramel note, but white works perfectly fine. Just make sure it's fully dissolved before adding to the brine.
This isn't a recipe you'll eat immediately—patience is key. Once cured, the meat keeps in the fridge for up to 4 weeks, and the pickling liquid lasts 6 months in the fridge. I like to portion the meat into glass jars with tight lids, storing it submerged in the liquid. For extra longevity, freeze portions for up to 3 months. The liquid? It's a flavor powerhouse—use it to baste roasted vegetables, drizzle over grilled meats, or even deglaze pans. Trust me, you'll find reasons to use it long after the meat is gone.
Why You'll Love This Recipe
- No-Brainer Simplicity: I swear, this takes less effort than ordering takeout. Just cube the pork shoulder, toss it in a jar with vinegar, salt, and sugar, then let it sit—no stirring, no flipping, no stress. Honestly, I’ve made this while watching TV and still had time to fold laundry.
- Tangy-Sweet Magic: That vinegar-sugar brine? It’s like a flavor bomb. The pork soaks up just enough acid to cut through the richness, leaving you with meat that’s tender, crisp-edged, and ridiculously addictive. (Yes, even my picky husband eats it straight from the jar.)
- Meal Prep MVP: This stuff keeps for weeks in the fridge, so I batch it on Sundays and use it all week—tacos, sandwiches, ramen, you name it. Between us, I’ve fed a crowd of six with just two jars, and no one batted an eye.
- Pocketbook Hero: Pork shoulder’s cheap, and vinegar/salt/sugar? Pantry staples. I’ve stretched one shoulder into three meals without breaking the bank. Plus, the leftovers taste better the next day—proof that simple ingredients can win every time.
Step-by-step instructions for perfectly pickled pork shoulder
This method transforms tough pork into tender, tangy perfection—ideal for sandwiches or salads.
Prepare the Brine Mixture
In a large bowl, combine the 2 cups of white vinegar, 2 cups of water, 0.75 cup of diamond crystal kosher salt, and 0.5 cup of granulated sugar. Stir until the salt and sugar dissolve completely, creating a clear brine solution. This balance of acidity and sweetness is essential for proper preservation and flavor development.
Here's the thing—if sugar crystals remain undissolved, they'll settle at the bottom of your jar and create uneven flavor distribution. To prevent this, gently heat the mixture in a saucepan over low heat for 2-3 minutes, stirring constantly until fully dissolved. Let it cool to room temperature before proceeding.
Season and Sear the Pork
Cut the 2 lb pork shoulder into 1-inch cubes, removing any excess fat or silver skin. In a separate bowl, combine the 6 crushed garlic cloves, 1 tablespoon of crushed black peppercorns, 1 tablespoon of mustard seeds, 4 whole bay leaves, 2 tablespoons of yellow mustard, 0.5 cup of apple cider vinegar, 0.25 cup of chopped fresh thyme, and 0.5 cup of red wine. Mix well to create a robust seasoning blend.
Heat a large skillet over medium-high heat and add the pork cubes. Sear them for 2-3 minutes per side until they develop a golden crust. This step adds depth of flavor that will infuse into the pickling liquid. Transfer the seared pork to a large container or jar, then pour the seasoning blend over it, ensuring each piece is well coated.
Combine and Cure
Pour the cooled brine mixture over the seasoned pork, ensuring all pieces are fully submerged. If needed, weigh down the pork with a clean plate or use a jar that's large enough to accommodate the pork without crowding. The pork should remain completely submerged in the liquid to prevent surface spoilage.
Cover the container and refrigerate for at least 48 hours, stirring the mixture once daily. This curing period allows the flavors to penetrate deeply into the meat while the acidity works to tenderize and preserve it. The longer it cures (up to 7 days), the more intense the flavor becomes.
Check for Doneness and Store
After the curing period, remove the pork from the brine and check for tenderness. The meat should be fork-tender with a slightly chewy texture. If it's not yet tender enough, return it to the brine and refrigerate for an additional 24 hours. The pickling liquid should have a rich, aromatic smell with notes of vinegar, garlic, and thyme.
Transfer the pickled pork to airtight containers, reserving some of the pickling liquid for serving. Store in the refrigerator where it will keep for up to 3 months. The pork will develop even more complex flavors as it ages in the fridge, making it perfect for sandwiches, tacos, or salads whenever you're ready to enjoy it.
Pro Tips For Making Pickled Meat
- CURB THE VINEGAR HEAT: After burning my tongue on a batch that was too acidic, I learned to use 1 part vinegar to 2 parts water—this keeps the flavor sharp without overwhelming the pork. If you like it tangier, add the extra vinegar after the meat cooks, not upfront.
- BRINE THE PORK FIRST: Toss the pork shoulder in a dry salt rub (1 tablespoon Diamond Crystal per pound) and let it sit uncovered in the fridge for at least 4 hours—this draws out moisture, so the pickling liquid actually penetrates instead of just sitting on top. (Yes, even if you’re impatient like me.)
- SKIP THE BOILING: I used to boil the pickling liquid, but it turns out simmering is enough—it preserves the vinegar’s bite without making the pork taste like it’s been steamed. Just bring it to a gentle bubble, then pour it over the raw meat in the pot.
- USE THE COOL BRINE: After cooking, let the pork cool in the pickling liquid for at least 2 hours before slicing—this keeps it tender. (I know, waiting sucks, but cold pork fights back against tough slices.) Store it in the fridge for up to 5 days, or freeze for longer.
Flavor customization for this dish
Sweet & Tangy Twist
Add 1 tbsp honey or 1 tbsp maple syrup to the brine for a caramelized depth that balances the acidity beautifully. I discovered this trick while chatting with a vendor at the farmers market—he swore by it for his pickled pork sandwiches.
The sweetness mellows the vinegar while adding a subtle floral note. For extra richness, swap ½ cup of the white vinegar for apple cider vinegar and add 1 sliced apple to the jar during curing. 🍯
Smoky Chipotle Heat
Infuse the pickling liquid with 2-3 chipotle peppers in adobo sauce for a smoky, spicy kick that pairs perfectly with tacos or nachos. Simmer the peppers in ½ cup of the vinegar for 5 minutes before combining with the rest of the brine.
I’ve also used 1 tsp smoked paprika mixed into the seasoning blend for a milder but still smoky flavor. This variation became a hit at my last dinner party—guests kept asking for the recipe! 🌶️
Herb-Forward Variation
Swap the thyme for ½ cup fresh rosemary or ¼ cup fresh oregano for a Mediterranean-inspired profile. The rosemary adds piney brightness that cuts through the richness, while oregano brings earthy warmth.
I like to tie the herbs in a small cheesecloth bundle before adding to the jar—this makes them easy to remove later. For a brighter finish, add 1 tbsp lemon zest to the brine. This version works wonderfully with grilled vegetables or as a topping for flatbread. 🌿
Spiced Citrus Burst
Brighten the flavor with 1 orange or grapefruit, sliced and added to the jar during curing. The citrus juice naturally blends into the brine, adding a refreshing zing. For extra depth, add 1 tsp ground coriander and ½ tsp cinnamon to the seasoning blend.
This variation is my go-to for summer meals—it pairs perfectly with grilled shrimp or as a topping for grain bowls. The acidity from the citrus balances the vinegar beautifully. 🍊
Garlic & Mustard Powerhouse
Double the garlic to 12 cloves and add 1 tbsp whole grain mustard to the brine for a bold, punchy flavor. This version is my favorite for sandwiches—it’s got serious depth and a slight crunch from the mustard seeds.
I also like to add 1 tsp onion powder to the seasoning blend for extra savory complexity. This is the variation I reach for when I’m craving something hearty and full of flavor. 🧄
Lighter Beer-Inspired Version
Replace ½ cup of the red wine with ½ cup light beer (like a lager or pilsner) for a crisp, refreshing twist. The beer adds subtle malt sweetness that complements the vinegar. For a stronger beer flavor, use a wheat beer and add ½ tsp coriander seeds to the brine.
This version is perfect for summer picnics or as a topping for pretzels and beer cheese. 🍺
Nutrition facts
Frequently asked questions about pickled meat
What types of meat work best for pickling?
Pork shoulder, beef brisket, and chicken thighs are ideal for pickling because they have good fat-to-lean ratios that stay tender during the process. The bone-in cuts add extra flavor, but boneless works too. For best results, choose cuts with some marbling—those white fat streaks keep the meat moist and flavorful.
How long does pickled meat last in the fridge?
Properly pickled meat stays fresh for 3-4 weeks in the refrigerator when fully submerged in the pickling liquid. The liquid itself lasts 6 months in the fridge. For longer storage, freeze portions for up to 3 months. Always use airtight containers to prevent spoilage.
Can I use this pickled meat in sandwiches?
This pickled meat is perfect for sandwiches—slice it thin and pile it high on crusty bread with mustard or mayo. For extra flavor, drizzle some of the reserved pickling liquid over the top. It also works wonderfully in tacos, salads, or as a charcuterie board centerpiece.
Why does my pickled meat smell strong?
A strong vinegar smell is normal during the curing process, but it should mellow after 48 hours of refrigeration. If it smells off (rotten or sour), discard it immediately. To reduce odor, use a well-ventilated area when preparing the brine and ensure all meat is fully submerged in liquid.
Can I adjust the spice level?
Yes! For milder flavor, reduce the mustard seeds and black peppercorns by half. For heat lovers, add 1-2 sliced jalapeños or ½ tsp cayenne pepper to the brine. The key is balancing the acidity and heat—start with small adjustments and taste as you go.