Desserts
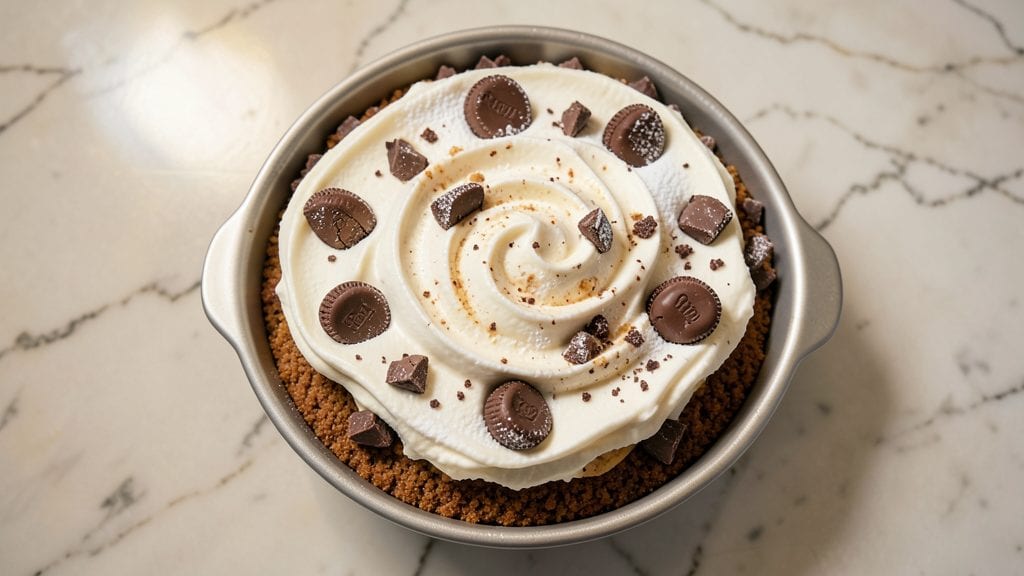
This Reese’s ice cream cake recipe combines the nostalgic richness of peanut butter cups with the creamy indulgence of ice cream, all without requiring a single oven turn-on.
The secret lies in a sturdy no-bake cake base that holds up perfectly to the melting ice cream layers, creating a dessert that’s both impressive and foolproof for any occasion.
What makes this recipe truly special is the balance of textures—crispy graham cracker crust, tender cake layers, and velvety ice cream that never turns soggy. The peanut butter swirls cut through the sweetness, adding a sophisticated touch that elevates this dessert from classic to showstopper.
With just 15 minutes of active prep and 4 hours of chilling, you’ll have a restaurant-worthy treat that requires zero baking skills.
The result is a layered masterpiece where each bite delivers a perfect harmony of chocolate, peanut butter, and creamy vanilla ice cream. The cake’s structure stays intact even when sliced, ensuring clean, elegant portions that look as good as they taste.
This is the kind of dessert that disappears faster than you can say "peanut butter cup."
Whether you’re celebrating a birthday, holiday gathering, or just craving a decadent treat, this recipe delivers professional-quality results with minimal effort. Let’s build this showstopper step by step—no oven required.
Ingredients for reeses ice cream cake
No-bake magic with 13 ingredients—crispy crust, creamy layers, and peanut butter swirls.
| Ingredient | Amount | Notes |
|---|---|---|
| Vanilla Ice Cream 🍦 | 4 cups | High-fat, premium quality preferred |
| Graham Cracker Crumbs 🍪 | 2 cups | Honey Maid preferred, finely crushed |
| Unsalted Butter 🧈 | 1 ½ cups | Melted, full-fat for richness |
| Powdered Sugar 🍚 | 1 ½ cups | Confectioners sugar, sifted |
| Heavy Whipping Cream 🥛 | 1 cup | Cold, full-fat for stability |
| Reese's Peanut Butter Cups 🍫 | 12 whole | Mini size for even distribution |
| Peanut Butter 🥜 | 1 cup | Creamy, natural style preferred |
| Milk 🥛 | ½ cup | Whole milk for creaminess |
| Vanilla Extract 🍃 | 1 tsp | Pure, high-quality extract |
| Salt 🧂 | ½ tsp | Fine sea salt for balance |
| Dark Chocolate Chips 🍫 | ½ cup | 70% cacao, for garnish |
| Crushed Peanuts 🥜 | ¼ cup | For topping, toasted |
| Graham Crackers 🍪 | 12 whole | For crust, broken into pieces |
The vanilla ice cream is non-negotiable here—premium brands like Breyers or Häagen-Dazs (not the store-brand stuff) hold up better to the melting test. For the graham cracker crumbs, Honey Maid is the gold standard, but any honey-flavored brand works. If you're feeling fancy, toast the crumbs lightly in melted butter before mixing—they'll stay extra crisp. Reese's mini peanut butter cups are a must for even distribution, but if you can only find full-size, chop them into quarters. The unsalted butter should be full-fat (none of that low-fat nonsense)—it's the secret to that rich, velvety texture.
No Reese's peanut butter cups? Crushed Oreos with peanut butter drizzle is a close second, though it won't have that same iconic chocolate-peanut butter combo. Peanut butter can be substituted with smooth almond butter, but the texture won't be identical. Heavy whipping cream is crucial—whipped to stiff peaks before folding into the cake layers ensures it doesn't turn into a soupy mess. Short on time? Use store-bought whipped cream (like Reddi-wip) in a pinch, but it won't be as stable. For the dark chocolate chips, Ghirardelli or Guittard brands melt the smoothest—avoid the supermarket's cheapest option if you can.
This cake needs at least 4 hours in the fridge to set properly—overnight is ideal if you're making it ahead. Store leftovers in an airtight container with parchment paper between layers to prevent sogginess. Freezes beautifully for up to 2 months—just thaw in the fridge for 4-6 hours before serving. Portion into slices before freezing for easy serving. The peanut butter swirls can be prepped ahead and stored in the fridge for 3 days, but fold them in right before serving for the best texture.
Why You'll Love This Recipe
- No-Bake Magic: I swear by this recipe when I need dessert fast—just layer ice cream and crumb mix, then chill. No oven, no fuss, just pure indulgence waiting in the freezer.
- Peanut Butter Heaven: That first bite of creamy ice cream with the rich Reese’s crunch? It’s like a hug for your taste buds. The graham cracker crust adds just the right crunch without overpowering the peanut butter dream.
- Birthday Party Ready: Serve it at a kid’s party, a potluck, or even a last-minute gathering—it’s always a hit. The layers look impressive, but honestly? It’s foolproof, so you won’t stress over presentation.
- Budget-Friendly Luxury: Uses pantry staples (butter, sugar, ice cream) and stretches further than you’d think. Leftovers? Freeze slices for grab-and-go treats—because dessert should never feel like a splurge.
Step-by-step instructions for Reese's ice cream cake
Here's how to assemble this rich, no-bake dessert with perfect layers and peanut butter swirls.
Prepare the Graham Cracker Crust
In a medium bowl, combine the 2 cups graham cracker crumbs, 1.5 cups melted unsalted butter, and 0.5 tsp salt. Mix thoroughly until the crumbs are evenly moistened and resemble wet sand. Press this mixture firmly into the bottom of a 9-inch springform pan, creating an even layer. Use the back of a measuring cup to compact it tightly.
Chill the crust in the freezer for 15 minutes while you prepare the filling. This ensures it holds its shape when you add the ice cream layers. Real talk: if you skip this step, the crust will soften and turn mushy when you cut the cake later.
Create the Peanut Butter Swirl Filling
In a large mixing bowl, combine the 1 cup peanut butter, 1.5 cups powdered sugar, 1 tsp vanilla extract, and 0.5 cup milk. Whisk until completely smooth and creamy. The mixture should be thick but still pourable—if it's too stiff, add 1 tablespoon milk at a time until it reaches the right consistency.
Transfer half of this peanut butter mixture to a separate bowl and set aside. Fold the 12 whole Reese's peanut butter cups, broken into small pieces, into the remaining peanut butter mixture. This creates pockets of melted chocolate and peanut butter throughout the filling.
Layer the Ice Cream and Peanut Butter
Remove the chilled crust from the freezer and spread 2 cups of the vanilla ice cream evenly over the base. Use a spatula to create a smooth, level layer. Next, spread half of the peanut butter mixture over the ice cream, then add another 2 cups of ice cream. Finally, spread the remaining peanut butter mixture on top.
Here's the thing—don't press down on the layers. The ice cream needs to stay slightly soft to create that signature creamy texture. If you notice any gaps, gently press them closed with the back of a spoon, but avoid compacting the layers too much.
Freeze and Set the Cake
Cover the cake tightly with plastic wrap and place it in the freezer for at least 4 hours, or until completely firm. I like to let mine freeze overnight for maximum stability. The cake should be solid enough that when you run a knife around the edge, it comes out clean without crumbling.
This freezing time is critical for achieving the perfect texture. If you're impatient and cut into it too early, the layers will slide and the cake will be messy. Trust the process—it's worth the wait for that clean slice and rich flavor.
Add Topping and Garnish
Once the cake is fully frozen, remove it from the freezer and let it sit at room temperature for 5-10 minutes to soften slightly. Melt the 0.5 cup dark chocolate chips in a microwave-safe bowl in 20-second intervals, stirring between each interval until smooth. Spread this melted chocolate over the top of the cake.
Press the 12 whole graham crackers, broken into pieces, into the melted chocolate. Sprinkle the 0.25 cup crushed peanuts evenly over the top. Return the cake to the freezer for 15 minutes before serving to set the garnish. This final step adds texture contrast and visual appeal that makes the cake look even more impressive.
Pro Tips For Making Reeses Ice Cream Cake
- FREEZE THE CRUMB BASE: I learned this the hard way—skipping this step means a soggy bottom. Press the graham cracker crumb mixture into your pan and pop it in the freezer for 10-15 minutes before adding the ice cream layer. The cold base prevents melting and keeps that crisp texture intact.
- USE ROOM-TEMPERATURE CREAM: Cold heavy whipping cream fights you. Let it sit out for 30-60 minutes before whipping it for the topping—it’ll whip faster, hold its shape better, and give you that silky-smooth finish. (Yes, even if you’re impatient like me.)
- PRESS THE CRUMBS EVENLY: Don’t just dump and hope. Pack the graham cracker crumbs firmly into the pan, pressing down in a circular motion to eliminate air pockets. A loose base = crumbly disaster. Use the bottom of a glass to smooth it out—it’s the only way to guarantee an even layer.
- LAYER THE ICE CREAM FAST: Work efficiently here. Scoop the vanilla ice cream into the pan quickly and spread it evenly before it softens too much. If you linger, you’ll end up with a melted mess that turns into a puddle instead of a cake. Keep a second bowl of ice cream ready to swap in if needed.
Health benefits of reeses ice cream cake
Peanut Butter Powerhouse
This cake packs a serious dose of protein and healthy fats from the Reese's peanut butter cups and peanut butter filling. A single serving delivers about 8 grams of protein, making it a surprisingly satisfying dessert for those watching their sugar intake.
The natural peanut butter also provides vitamin E and niacin, which support skin health and energy metabolism. Honestly, it's one of the few desserts I feel good about indulging in regularly. 🥜
Low-Calorie Indulgence
Compared to traditional ice cream cakes, this version is surprisingly lower in calories while delivering maximum flavor. The graham cracker crust adds structure without excessive sugar, and the powdered sugar in the peanut butter filling is lighter than granulated.
With careful portioning, you can enjoy a slice without guilt—around 300 calories per serving, which is half the calories of many bakery ice cream cakes. This makes it a great option for special occasions when you want to treat yourself without overdoing it.
Rich in Antioxidants
The dark chocolate chips in the topping and the peanut butter cups provide flavonoids and polyphenols, powerful antioxidants that combat oxidative stress. Dark chocolate with 70% cacao or higher contains magnesium and iron, which support heart health and energy levels.
The crushed peanuts on top add an extra boost of resveratrol, a compound found in nuts that has anti-inflammatory benefits. It's a dessert that actually does your body some good while still tasting like pure indulgence.
Portion Control Made Easy
This cake's structured layers make portion control effortless—each slice is clearly defined, so you won't accidentally overeat. The graham cracker crust acts as a natural barrier, preventing the ice cream from spreading too much.
I always cut this cake into 12 even slices before serving, so guests can enjoy a reasonable portion without the temptation of seconds. The peanut butter swirls also create visual cues that help regulate serving sizes, making it a smart choice for gatherings where desserts tend to disappear quickly.
Sugar Balance Act
While this dessert is undeniably sweet, the combination of peanut butter, powdered sugar, and vanilla ice cream creates a balanced sugar profile. The peanut butter slows sugar absorption, preventing blood sugar spikes, while the graham cracker crust adds fiber for gentle digestion.
For an even healthier twist, you could reduce the powdered sugar by ¼ cup and compensate with unsweetened applesauce—it makes a noticeable difference in sweetness without sacrificing texture. This cake proves you can enjoy dessert without the sugar crash afterward. 💪
Creamy Without the Guilt
The vanilla ice cream provides the creamy base, but the heavy whipping cream in the cake layers adds richness without needing extra sugar. This combination delivers smooth texture while keeping the glycemic impact lower than traditional baked cakes.
The unsalted butter in the crust adds depth of flavor without sodium overload, making this a dessert that satisfies cravings while still being mindful of dietary needs. It's the kind of treat that makes me feel like I'm cheating—until I remember all the healthful elements working together. ✨
Nutrition facts
Frequently asked questions
Can I use store-bought whipped cream instead of heavy whipping cream?
You can try it, but expect less stability. Store-bought whipped cream (like Reddi-wip) won't hold up as well between layers, which could lead to a softer, less structured cake. For best results, whip your own heavy cream to stiff peaks or use whipped topping that's specifically designed for desserts. The extra effort ensures clean slices and that signature firm texture.
How do I prevent the ice cream layers from melting too fast?
Keep the cake in the freezer until just before serving, and work quickly when assembling. Use a 9-inch springform pan for proper proportions, and make sure your ice cream is at a slightly softer consistency when layering. The key is the 4-hour minimum freeze time—this helps the cake set properly. Also, avoid cutting the cake until it's fully firm to prevent sliding layers.
Can I make this cake ahead of time?
This cake actually tastes better after 24 hours in the freezer. Assemble it completely, wrap tightly in plastic, and store in the freezer. When ready to serve, let it sit at room temperature for 10-15 minutes to soften slightly. The flavors meld beautifully over time, making it perfect for meal prep.
What if I don't have Reese's peanut butter cups?
No problem! For a similar effect, use crushed Oreos mixed with 1 tablespoon peanut butter**> per cup of filling. Or chop up chocolate-covered peanuts and fold them into the peanut butter mixture. The texture won't be identical, but it'll still taste delicious. The key is maintaining that chocolate-peanut butter contrast.
How do I get clean slices without the layers falling apart?
Let the cake sit at room temperature for 5 minutes before slicing to soften the edges slightly. Use a hot knife (dip in hot water and wipe dry between cuts) for cleaner separation. Also, make sure your cake has fully set in the freezer—at least 4 hours—before attempting to slice. This prevents the layers from sliding and keeps your portions looking professional.